Do you want to get the most out of your Eufy Robovac device? Well, if it is your desire, you have landed on the right page. In this article, you will be able to discover the simple & straightforward steps to connect Eufy Robovac to WiFi.
Can’t you believe it?
Undoubtedly, in this blog post, you will be familiar with the user-friendly instructions to establish a firm connection between the devices effortlessly. Once you have success in linking your device to Wi-Fi, you can be able to manage the device through the Eufy app in a convenient way.
Are you seeking more help connecting your Eufy Robovac to WiFi? If so, you will not be disappointed after walking through this post. So, why are you wasting your precious time on useless things? Let’s come to the main topic and dig a little deeper into the information given below.
Buckle up!!
Step-by-step process to Connect Eufy Robovac to WiFi
Are you stepping ahead to connect Eufy Robovac to WiFi? Well, it is the best opportunity for you to take full advantage of the features of this device.
Now, it is clear that you will be able to access its features such as – remote control via the app, scheduled cleanings, and firmware updates.
Let’s move ahead and keep an eye on the step-by-step guide that will assist you in connecting your Eufy Robovac to WiFi.
Step 1: Preparation
First of all, you need to ensure that you possess the things given below. Let’s have an overview of them:
- Eufy RoboVac: Make sure that your RoboVac is charged and ready.
- WiFi Network: Next, you are required to confirm that your WiFi network is 2.4GHz. Eufy RoboVac does not support 5GHz networks.
- Smartphone/Tablet: In this step, confirm that your smartphone or tablet with the EufyHome app installed.
- EufyHome App: Now, download and install the EufyHome app from the App Store (iOS) or Google Play Store (Android).
- WiFi Password: It is the right time to cross-check that your WiFi password is handy.
Step 2: Position the RoboVac and Router
- Proximity: This step is all about placing the RoboVac and the router close to each other. It will help you ensure that the Wi-Fi signals are strong during the setup process. It will allow you to move them to their locations as per your desire. You can do it once you are done with the process of establishing the connection.
- Power Up: Now, you have to turn on your Eufy RoboVac. For this, you need to press the power button on the device or the remote control.
Step 3: Open the EufyHome App
- Create an Account: Don’t you have a Eufy account? If so, you can choose to create one. For this, you are required to follow the on-screen instructions. If you already have an account, you can easily proceed to log in using your credentials.
- Permissions: This step is all about verifying that you have granted the necessary permissions for the app. Through this, you can easily access your device’s location, Bluetooth, and WiFi settings.
Step 4: Add Your Device
- Home Screen: On the home screen of your app, tap the “+” icon or the “Add Device” button.
- Select Device: Now, you have to choose your specific Eufy RoboVac model from the list of available devices.
Step 5: Enter Pairing Mode
- Power Button: This step is about holding down the RoboVac’s power button for about 10 seconds. When you hear a beep, you can release the button promptly. Later on, the WiFi indicator light starts flashing.
- App Instructions: After that, follow the instructions on the EufyHome app. These instructions may include – pressing certain buttons or confirming that the RoboVac’s status light is flashing.
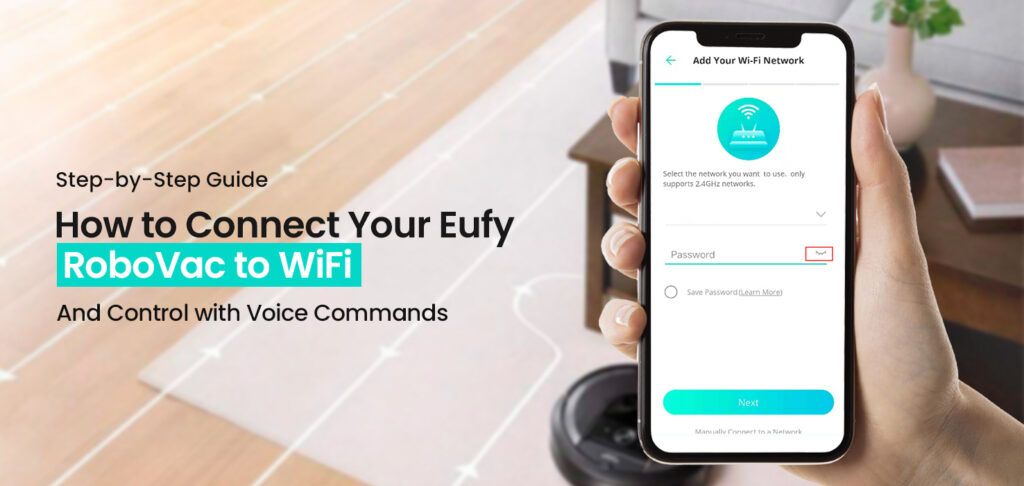
Step 6: Connect to Your WiFi Network
- WiFi Setup: You will find the prompts on the screen to enter your WiFi network name (SSID) and password. So, you need to ensure that you’ve entered the correct details and confirmation as well.
- Scanning: Later on, the app will scan for your RoboVac. The whole process may take a few moments. So, ensure that your smartphone or tablet is connected to the same 2.4GHz WiFi network.
Step 7: Complete the Connection
- Confirmation: Once you are done with connecting your RoboVac to the WiFi network, the WiFi indicator will be lit. Later on, the light on the RoboVac will turn solid blue. Usually, the light is blue.
- App Notification: Thereafter, the EufyHome app will notify you that the RoboVac is successfully connected.
Step 8: Test the Connection
- Remote Control: Do you want to control the RoboVac? If so, you can get the assistance of the Eufy app. It will help you test features like – starting a cleaning session, pausing, and sending the RoboVac back to the charging dock.
- Scheduled Cleanings: Afterward, you can set up a cleaning schedule. It will allow you to ensure your RoboVac cleans automatically at specified times.
Troubleshooting Tips
Are you encountering several issues while you are going to connect Eufy Robovac to WiFi? You can try the troubleshooting steps given below –
- Ensure your router broadcasts a 2.4GHz signal.
- Make sure that your network settings are not overly restrictive.
- Disable MAC address filtering the network is set to a visible (not hidden) SSID.
- Ensure the RoboVac and your router are closed during setup.
- Once you are done with the process of setting up your device, you can easily move it to its actual position.
- Keep your router away from other electronic devices such as – microwaves and cordless phones.
- Restart both the router and the RoboVac.
- Reboot your smartphone or tablet.
- If the issue still persists, you can perform a factory reset on your RoboVac.
- Ensure that the EufyHome app is up to date as per the latest version available.
- To improve connectivity and performance, you can upgrade the firmware of your device.
Bottom-line
In a nutshell, after exploring the information given above, you can easily connect Eufy RoboVac to WiFi. It will help you to enhance the functionality of your device.
Apart from that, you can ensure a seamless as well as a smooth setup process. This way, you can manage your RoboVac through your smartphone or tablet more conveniently.
In case you encounter any issues, it is recommended to follow the troubleshooting tips given above. It will be helpful to you to fix the common issues.


Later on, you can also confirm the successful connectivity of your device to the WiFi. Don’t forget to share your thoughts in the comment section below.
For more amazing articles check our website aDigital Lamp now!